System security starts here.
Whether you aim to deepen your understanding of security principles or need to quickly deploy configurations, we provide the ultimate resource.

Step 1: Introduction & Requirements
Welcome to the Ubuntu Hardening Script guide. Before proceeding, ensure your target environment meets the strict prerequisites required to execute the framework safely.
System Requirements
- Ubuntu Linux 24.04 LTS
- Root/sudo privileges
- Bash shell environment
Step 2: Core Architecture
Once extracted, the toolkit contains specific files and directories required for execution, reporting, and recovery. Note: The SECTION_X_DETAILS.md files include deep-dive details for each configuration section.
cis_hardening.sh
The primary executable script that orchestrates the hardening process.
config.env
The master configuration file. Auto-created if missing on first run.
report/
Output directory containing the generated CSV compliance reports.
backup_temp/
Houses temporary backup files. Compressed to a tar.gz archive upon completion.
Directory Structure
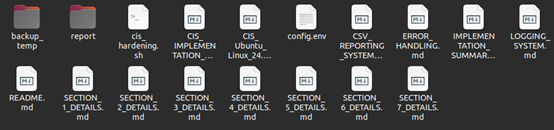
Step 3: Configuration & Logging
You can customize the script's behavior by editing the config.env file. Below are the default environmental variables you can adjust to fit your infrastructure.
REPORT_DIR="report"
Defines the report output directory (relative to script path).
BACKUP_TEMP_DIR="backup_temp"
Defines the temporary storage for pre-modification backups.
LOG_FILE="/var/log/cis-hardening.log"
The absolute path where execution logs are written.
Step 4: Backups & Reports
Backup Mechanism
Before any system changes are applied, all targeted configuration files are copied. Once processing is complete, the backup directory is compressed into an archive.
backup_temp/TIMESTAMP.tar.gz
CSV Generation
The script outputs detailed CSV files post-execution. The columns include:
- Section: The CIS ID (e.g.,
'1.1.1.1','5.1.6'). - Status: SKIPPED, FIXED, FAILED, VERIFY_FAILED, DRY-RUN, or **PASS**.
- Timestamp: Exact time of processing.
- Details: Additional outcome information.
Step 5: Installation
Follow these instructions to safely install the product onto your system environments.
Download the Hardening Toolkit
Enter the following command in your Ubuntu terminal to download the toolkit:
curl -O https://auto-harden.shlave.com/auto-harden.zip
Extract the Files
Install the unzip tool (if not already installed) and extract the downloaded file:
sudo apt-get install unzip -y
unzip auto-harden.zip
cd auto-harden
Grant Permissions and Execute
Grant execution permissions to the script and run the hardening process:
chmod +x cis_hardening.sh
sudo ./cis_hardening.sh
Step 6: Execution Modes
The script offers versatile run parameters. Note: Dry-run and Verify-only modes cannot be combined in a single execution. Verify-only mode does not generate backups.
Standard Run (Specific Sections)
sudo bash cis_hardening.sh 1,3,5
Applies hardening to sections 1, 3, and 5. Backups are created and scripts continue even if one section fails.
Dry-Run Mode
sudo bash cis_hardening.sh --dry-run 1,3,5
# or using shorthand
sudo bash cis_hardening.sh -d 1,3,5
Previews changes in the console without actually applying them to the system files.
Verify-Only Mode
sudo bash cis_hardening.sh --verify-only 1,3,5
# or using shorthand
sudo bash cis_hardening.sh -v 1,3,5
Performs compliance checks and generates a CSV report without modifying system configurations.
Access Documentation
bash cis_hardening.sh --help